How to Use the Cookie Consent Banner Text
Policy Overview & Implementation Guide for CMP & Engineering Deployment
Deploy compliant cookie consent copy in one spec.
This is a plain-text implementation spec, not a fillable form. It contains pre-vetted banner copy, toggle taxonomy, and compliance checklists. Hand it directly to your engineering or CMP team for deployment.
This is a plain-text implementation spec, not a fillable form. It contains pre-vetted banner copy, toggle taxonomy, and compliance checklists. You will edit it directly, replace placeholders, select your preferred options, and hand the finalized text to your engineering or CMP team for deployment.
Recommended Owner: Privacy/Legal, Frontend Engineering, or Marketing Ops | Approval Required: Legal Counsel + Engineering/QA Sign-Off
Section 1
Getting Started
- Open & Edit: Open PRI-005.txt in any plain-text editor (VS Code, Notepad, TextEdit, or your IDE). Do not use Word or Google Docs, as they will add hidden formatting.
- Understand the Placeholders: [BOLD BRACKETED TEXT] = Values you must replace (e.g., [Company Name], [Cookie Policy URL]).
OPTION 1 / 2 / 3= Pick one banner style. Delete the unused options or move them to an archive file. Note: / Recommended: = Implementation guidance for engineering. They do not appear on the live site. - This is a Blueprint, Not a Final Artifact: The finished output lives in your CMP (OneTrust, Cookiebot, Osano, etc.) or custom banner code. This .txt file is your source of truth and audit trail.
Keep the file strictly plain-text. Strip all rich formatting before sharing with your CMP or frontend team.
Section 2
Key Things to Decide
Before editing, align on these operational points:
-
Which banner option matches your UX? Option 1 (Global Standard), Option 2 (Minimalist), or Option 3 (Detailed/Transparent).
-
What is your jurisdiction scope? EU/UK requires prior consent. CA requires opt-out + GPC recognition. Other states may require targeted advertising opt-outs.
-
What CMP or tag manager will you use? Ensure your platform supports granular category toggles, consent logging, and GPC signal detection.
-
Will you sync consent across devices/account logins? If not, the banner must clearly state consent is browser/device-specific.
Section 3
Step-by-Step: How to Fill Out & Customize the Text File
Follow this exact workflow to customize the .txt template:
-
1
Replace All Placeholders
Use your editor’s Find & Replace to swap every
[BRACKETED ITEM]with your actual values:- [Company Name] → Your legal/trading name
- [Cookie Policy URL] → Direct link to your live cookie policy
- [Privacy Policy URL] → Direct link to your live privacy notice
- [Link: Legitimate Interest Objection Form] → Your DPO contact page or objection form URL
- [View our list of advertising and analytics partners] → Dynamic vendor disclosure page
-
2
Select & Keep ONE Banner Option
- Keep your chosen option (1, 2, or 3).
- Delete the other two options from the file to avoid confusion during handoff.
- Verify that all button/link placeholders are replaced or mapped to your design system.
-
3
Map Cookie Categories to Your Stack
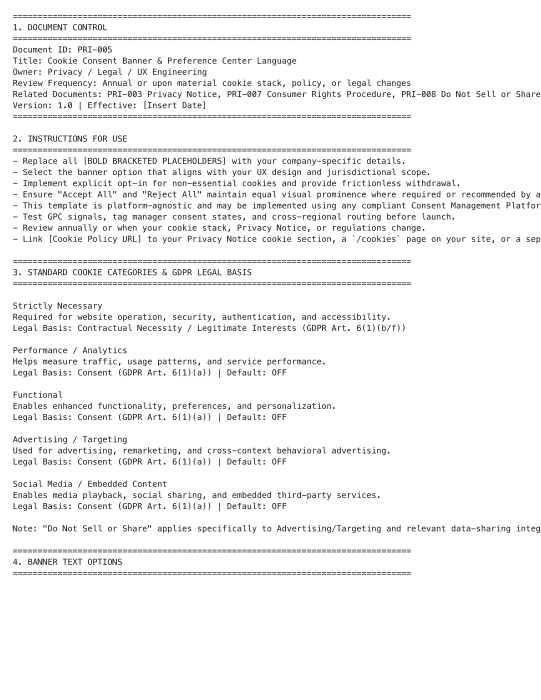
- In Section 3, cross-reference the five standard categories with your actual cookie inventory.
- Remove any category you do not use. Do not leave unused toggles in the preference center.
- Ensure your CMP is configured so Performance, Functional, Advertising, and Social defaults are OFF.
-
4
Customize Regional & Implementation Notes
- In Section 6 & 8, remove or adapt jurisdictional rules that don’t apply to your traffic.
- Keep the checklist intact. It serves as your QA gate before production deployment.
-
5
Prepare for Engineering Handoff
- Save the customized file as
PRI-005_Cookie_Consent_Spec_v1.0_FINAL.txt. - Share it with your frontend/CMP team alongside:
- Your tag manager setup docs
- Accessibility requirements (WCAG 2.1 AA)
- Consent log schema
- Save the customized file as
Section 4
Before You Finalize
- Did you replace all
[brackets]with live URLs, company names, and actual paths? - Did you select one banner option and delete the unused ones from the file?
- Are all non-essential cookie categories set to OFF by default in your CMP config?
- Does the consent log capture the exact audit fields listed in Section 8?
- Has legal counsel reviewed the final copy, regional routing, and GPC implementation?
- Is the banner/preference center keyboard-navigable and screen-reader compatible?
- Have you tested consent suppression across Chrome, Safari (ITP), Firefox (ETP), and Brave?
Section 5
Where to Store & Execute It
-
Version Control Commit the finalized .txt file to your compliance/Git repository. Treat it as a living spec that updates with your CMP config.
-
Deployment Engineering copies the finalized banner text, toggle labels, and routing rules directly into your CMP or front-end codebase.
-
Audit Evidence Regulators and auditors will request this file alongside your CMP configuration export and sample consent logs. It proves your banner copy, legal basis mapping, and implementation checklist were formally reviewed before launch.
-
Review Cadence Update the .txt file annually or whenever you add/remove cookies, change vendors, update your privacy policy, or encounter new regional guidance.
Pro Tips
Best Practices for Consent Deployment
- Keep It Lean: Delete unused sections before handoff. Engineering teams deploy faster when the spec contains only live, applicable text.
- Document Routing Logic Separately: This .txt covers copy and structure. Store IP/geolocation routing rules in your CMP dashboard or tag manager config, not in the text file.
- Test Before You Ship: Use your browser’s dev tools + privacy extensions (uBlock, Ghostery) to verify rejected cookies are truly blocked before consent.
- Log for Defensibility: Consent logs are your primary regulatory defense. Keep them queryable, region-tagged, and retained for 12 months.
FAQ
Frequently Asked Questions
No. Pick the one that matches your UX and legal requirements. Delete or archive the other two so engineering only implements live, approved copy.
This file is the source of truth. Your CMP admin copies the exact text, toggle labels, and routing rules into the platform configuration. Keep the .txt version-controlled for audit trails.
Keep the regional routing notes in Section 6/8 and configure your CMP to serve different banner versions or consent models based on IP geolocation. Document the routing rules in your CMP dashboard.