DSAR Management Kit Guide
Manage Data Subject Access Requests efficiently with standardized forms and audit-ready tracking.
Two files. One compliant workflow.
Standardized DSAR intake form + internal operations tracker for GDPR, CCPA/CPRA, and global privacy compliance.
DSAR management template — This kit contains two files that work together to manage Data Subject Access Requests (DSARs) in compliance with GDPR, CCPA/CPRA, and other privacy laws.
- 📄 PRI-002_DSAR_Form.docx – Standardized intake form for requesters to submit details and verification.
- 📊 PRI-002_DSAR_Log.xlsx – Internal operations tracker for deadlines, assignments, status, and SLA metrics.
Follow this guide to process requests efficiently, maintain legal compliance, and preserve audit-ready records.
Before you start
Getting Started
- Two files: Use the DOCX for requester intake and the XLSX for internal tracking — keep them in sync with the same request ID.
- Excel: Click Enable Editing when prompted. Use dropdowns in the log; do not type free text in validated columns.
- Gray sample rows in the log are examples — overwrite or delete before sharing with auditors.
Part 1
Using the DSAR Form (DOCX)
Purpose: Ensure you receive complete, actionable information from requesters.
Publish the form on your privacy policy page or support portal.
Send it directly to users who submit informal data requests via email or chat.
Accept completed forms through secure channels only.
Section 1: Requester Information – Captures contact details and preferred communication method.
Section 2: Authorized Agent – Required for CCPA/CPRA submissions on behalf of another individual. Verify attached authorization before proceeding.
Section 3: Rights Exercised – Users check all applicable rights. Multiple selections are permitted.
Section 4: Scope & Specifications – Limit the request to relevant systems or data categories when needed.
Section 5: Identity Verification – Do not fulfill requests until identity is confirmed. Accept government ID, utility bills, or secure digital verification codes. Remove verification documents from your systems once the request is closed.
Internal Use Table (Bottom) – Complete this internally after receipt. Track the assigned ID, verification status, deadline, and final outcome.
Only accept submissions through approved, access-controlled channels.
Store completed forms in a restricted directory with role-based access.
Never forward raw personal data via unapproved messaging or email platforms.
Part 2
Using the DSAR Log (XLSX)
Purpose: Centralized tracking for compliance deadlines, team routing, and performance metrics.
Date Received: Enter the intake date.
Jurisdiction: Select GDPR, CCPA/CPRA, LGPD, or Other. The Deadline (Days) and Response Deadline columns populate automatically.
Request Type: Match the checkboxes from the submitted form.
Assigned To (Col L): Route to the responsible owner (Legal, Privacy, Support, or Engineering).
Verification Method/Date: Record how and when identity was confirmed.
Status: Update as you work through the request. Use Verification Pending, In Progress, Extended, Completed, or Denied.
Date Closed (Col U): Enter the fulfillment date. This field powers SLA calculations and dashboard metrics.
If a request qualifies for a legal extension, select Yes in Extension Granted?.
Manually enter the new deadline in Extended Deadline. Timeframe allowances vary by jurisdiction and case complexity, so manual override ensures legal accuracy.
Update status to Extended and note the justification in the Notes column.
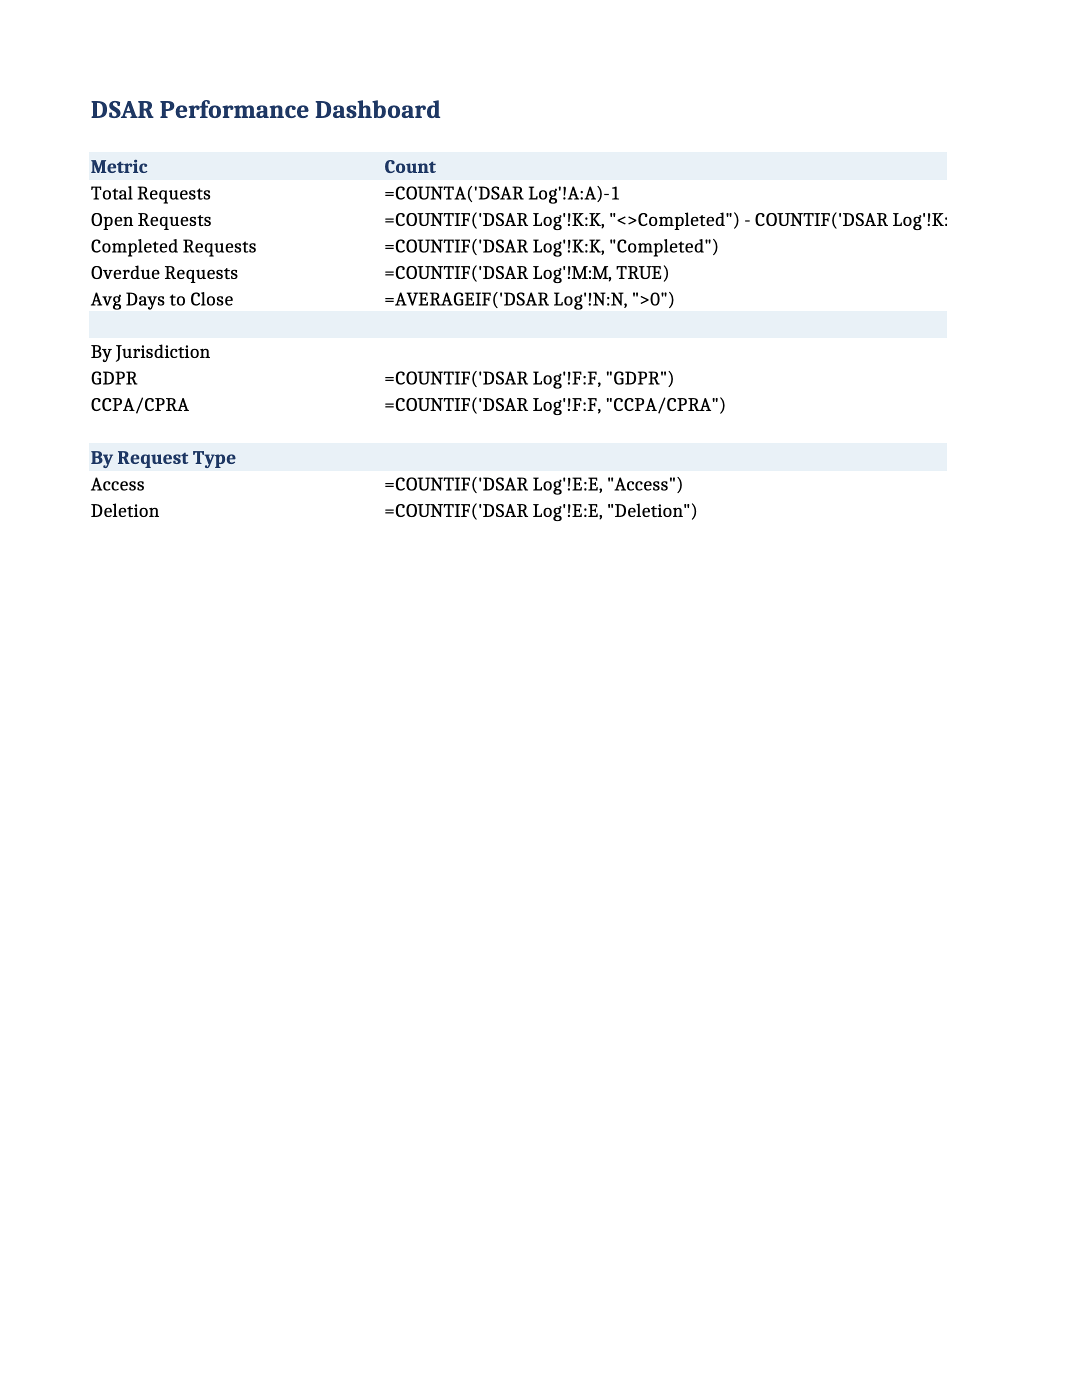
Open Requests: Tracks active items awaiting fulfillment.
Overdue Requests: Flags items past their deadline for immediate review.
Avg Days to Close: Measures team performance against legal SLAs.
Conditional formatting highlights rows Yellow (within 5 days of deadline) and Red (overdue).
Workflow
End-to-End Workflow
- 1Receive Form → Requester submits the DOCX form through an approved channel.
- 2Create Log Entry → Open the XLSX tracker. Add a row, assign an ID, record intake date, jurisdiction, and owner.
- 3Verify Identity → Review Section 5 of the form. Record method and date in the log.
- 4Locate & Extract → Use the Scope & Specifications section to narrow data retrieval. Export only the requested categories.
- 5Review & Redact → Remove third-party data, privileged information, or legally exempt records before delivery.
- 6Deliver & Close → Transmit the response via an approved channel. Enter the Date Closed in the log and update status to Completed.
- 7Archive → Store the completed form, verification record, export manifest, and delivery confirmation in your restricted DSAR repository.
Best Practices
Best Practices for Compliance
- Verification First: Never disclose or delete data before confirming the requester’s identity.
- Data Minimization: Export only what is explicitly requested. Overproduction increases legal risk.
- Controlled Delivery: Use approved transfer methods that align with your organization’s data handling policy.
- Retention: Retain completed DSAR records according to your organization’s retention schedule and applicable legal requirements.
- Quarterly Review: Use the Dashboard to identify processing bottlenecks, common request types, or jurisdiction trends that require policy updates.
FAQ
Frequently Asked Questions
Document the actual delivery date, record the reason for delay in the Notes column, and update internal procedures. Regulators generally expect organizations to demonstrate documented, reasonable compliance efforts and remediation actions.
Yes. Replace [yourcompany].com and address placeholders with your official contact details. Preserve the structure to maintain compliance alignment.
Only core tracking fields are necessary for audit readiness. Optional fields (Data Export Location, Denial Reason) improve operational transparency and team coordination.
If a requester qualifies under multiple laws, apply the strictest applicable timeframe (e.g., GDPR’s 30-day window). Note both jurisdictions in the Jurisdiction column for audit clarity.